# 对接目标及 pac4j 依赖
我们以对接 GitHub 进行实战,能从项目指定路径 /login/github 跳转 GitHub 认证后,获取登录用户的相关信息在界面展示,其他 API 配置为不受此认证限定。
项目中采用 Spring Security 进行认证对接,并使用 JEE 相关的 Filter 实现认证、回调跳转,所以我们需要引入相关依赖 spring-security-pac4j,版本选择 8.0.0;引入 JEE 依赖 javaee-pac4j,版本选择 7.1.0。
然后我们需要引入 pac4j 核心依赖 pac4j-core,由于 6.0.0 版本还处于 RC,当前版本选择 5.7.0,同时,引入pac4j-javaee,以提供相关一些附加支持。(如果 Spring Boot 选择了 3.0.1 版本,将会引发 Tomcat 相关实现类的包名由 javax 变更为 jakaraee,pac4j-javaee 也要变更为 pac4j-jakaratee,但由于很多其他组件还没有提供相应的支持,不建议选择这个版本。)
我们以 OAuth2.0 协议为例,引入相应的依赖 pac4j-oauth,版本与 pacj-core 一致,为 5.7.0。
后面如果需要其他协议的对接,引入相应协议的依赖即可。
pom.xml:
<?xml version="1.0" encoding="UTF-8"?>
<project xmlns="http://maven.apache.org/POM/4.0.0"
         xmlns:xsi="http://www.w3.org/2001/XMLSchema-instance"
         xsi:schemaLocation="http://maven.apache.org/POM/4.0.0 http://maven.apache.org/xsd/maven-4.0.0.xsd">
    <modelVersion>4.0.0</modelVersion>
    <parent>
        <groupId>org.springframework.boot</groupId>
        <artifactId>spring-boot-starter-parent</artifactId>
        <version>2.7.7</version>
        <relativePath/>
    </parent>
    <groupId>tech.bookhub</groupId>
    <artifactId>pac4j-demo</artifactId>
    <version>1.0-SNAPSHOT</version>
    <name>pac4j-demo</name>
    <description>pac4j demo project for Spring Boot.</description>
    <properties>
        <java.version>17</java.version>
        <maven.compiler.source>17</maven.compiler.source>
        <maven.compiler.target>17</maven.compiler.target>
        <project.build.sourceEncoding>UTF-8</project.build.sourceEncoding>
        <spring-security-pac4j.version>8.0.0</spring-security-pac4j.version>
        <javaee-pac4j.version>7.1.0</javaee-pac4j.version>
        <pac4j.version>5.7.0</pac4j.version>
    </properties>
    <dependencies>
        <dependency>
            <groupId>org.springframework.boot</groupId>
            <artifactId>spring-boot-starter-web</artifactId>
        </dependency>
        <dependency>
            <groupId>org.springframework.boot</groupId>
            <artifactId>spring-boot-starter-security</artifactId>
        </dependency>
        <dependency>
            <groupId>org.pac4j</groupId>
            <artifactId>spring-security-pac4j</artifactId>
            <version>${spring-security-pac4j.version}</version>
        </dependency>
        <dependency>
            <groupId>org.pac4j</groupId>
            <artifactId>pac4j-javaee</artifactId>
            <version>${pac4j.version}</version>
        </dependency>
        <dependency>
            <groupId>org.pac4j</groupId>
            <artifactId>javaee-pac4j</artifactId>
            <version>${javaee-pac4j.version}</version>
        </dependency>
        <dependency>
            <groupId>org.pac4j</groupId>
            <artifactId>pac4j-core</artifactId>
            <version>${pac4j.version}</version>
        </dependency>
        <dependency>
            <groupId>org.pac4j</groupId>
            <artifactId>pac4j-oauth</artifactId>
            <version>${pac4j.version}</version>
        </dependency>
        <dependency>
            <groupId>org.springframework.boot</groupId>
            <artifactId>spring-boot-starter-test</artifactId>
            <scope>test</scope>
        </dependency>
        <dependency>
            <groupId>org.springframework.security</groupId>
            <artifactId>spring-security-test</artifactId>
            <scope>test</scope>
        </dependency>
    </dependencies>
    <build>
        <plugins>
            <plugin>
                <groupId>org.springframework.boot</groupId>
                <artifactId>spring-boot-maven-plugin</artifactId>
            </plugin>
        </plugins>
    </build>
</project>
# 服务端配置
OAuth2.0 协议,在客户端进行认证对接前,我们需要在服务端配置客户端相关信息,然后获取服务端为客户端分配的认证信息。
我们以 GitHub 为例。我们进入 GitHub 官网 https://github.com/ (opens new window),登录账号后,点击网站右上角用户头像的下拉箭头,选择 “Settings”,进入设置界面,然后选择 “Developer settings”,最后选择 “OAuth Apps”,最终页面链接为 https://github.com/settings/developers (opens new window)。
我们点击“New OAuth App”,进入 OAuth 应用新建页面,如下图所示:
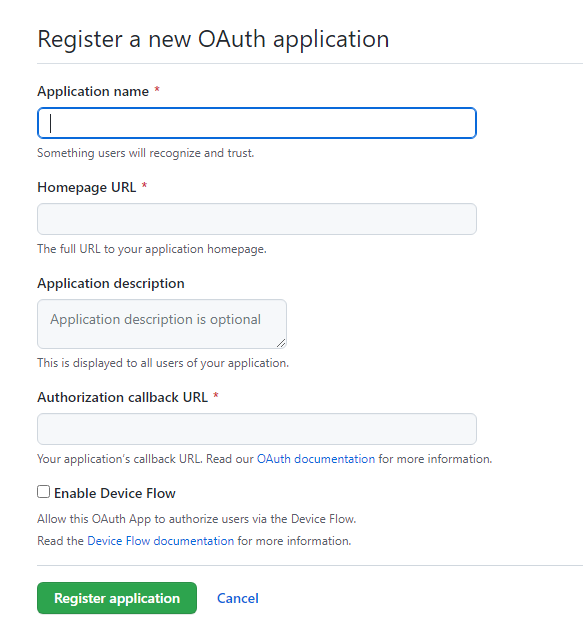
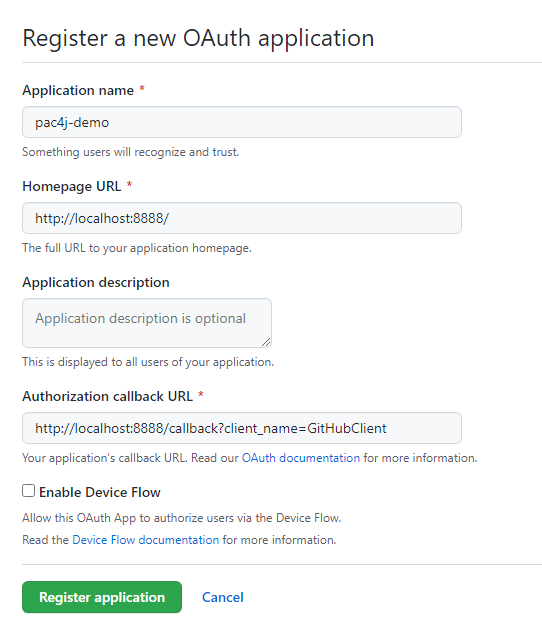
我们按要求填入相应信息,需要注意在 GitHub 中,“Homepage URL” 代表应用,即客户端的主页地址;“Authorization callback URL” 则代表服务端调用客户端的回调 url,如果客户端正式发布后,需要配置为客户端真实的访问地址,由于我们是在本地测试,所以我们都暂填写 localhost 作为访问地址即可。
| 填写项 | 示例值 |
|---|---|
Homepage URL | http://localhost:8888/ |
Authorization callback URL | http://localhost:8888/callback?client_name=GitHubClient |
此处注意 /callback?client_name=GitHubClient 我们为 pac4j 默认的标准回调地址实现,在实际项目中,我们还可以自定义。
填写信息示例如下图:
填写好后,我们点击 “Register application”,完成客户端注册。然后我们得到 GitHub 作为服务端分配的认证信息,如下图所示:
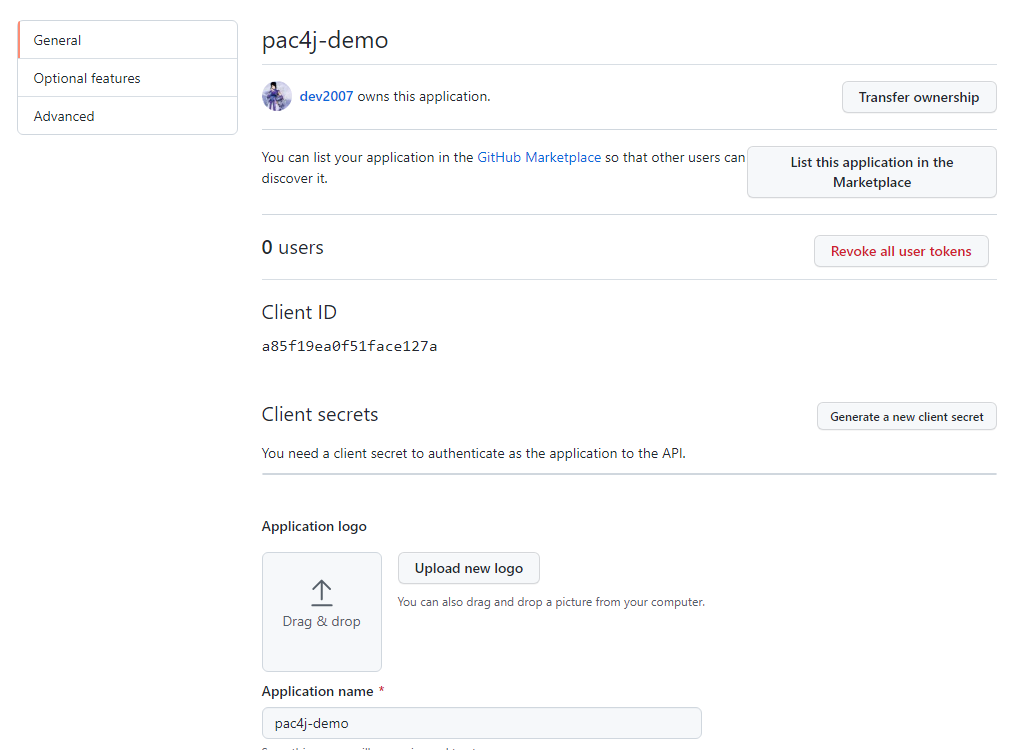
我们记录下认证用信息 “Client ID”,然后点击 “Generate a new client secert”,生成一个 “Client Secret”,如下图所示:
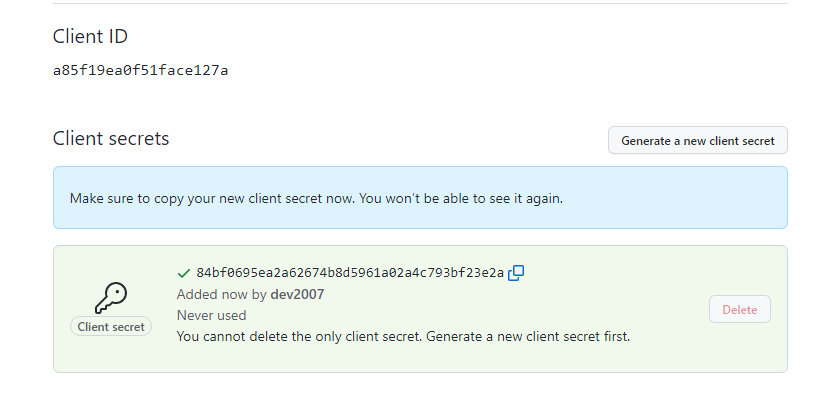
我们再记录下 “Client secret”,用于客户端配置的认证信息就齐了。
# 添加认证接口
我们先创建一个新的 LoginController 类,用于实现触发登录认证的 API。
LoginController.java:
package tech.bookhub.controller;
import org.pac4j.core.profile.UserProfile;
import org.pac4j.jee.context.JEEContext;
import org.pac4j.jee.context.session.JEESessionStore;
import org.pac4j.springframework.security.profile.SpringSecurityProfileManager;
import org.springframework.web.bind.annotation.GetMapping;
import org.springframework.web.bind.annotation.RestController;
import javax.servlet.http.HttpServletRequest;
import javax.servlet.http.HttpServletResponse;
import java.util.List;
@RestController
public class LoginController {
    @GetMapping("/login/github")
    public List<UserProfile> loginGithub(final HttpServletRequest request, final HttpServletResponse response) {
        final JEEContext jeeContext = new JEEContext(request, response);
        final SpringSecurityProfileManager profileManager = new SpringSecurityProfileManager(jeeContext, JEESessionStore.INSTANCE);
        return profileManager.getProfiles();
    }
}
API /login/github 的实现目标为:当认证通过后,此 API 响应登录到 GitHub 上的用户相关信息。
# 配置 pac4j
我们的项目作为客户端,需要配置 pac4j 以对接相应服务端的协议,由于服务端我们选择 GitHub 作为示例,那我们选择框架已实现的现成客户端 GitHubClient 进行配置。
我们先创建一个配置类,命名为 Pac4jConfig,并声明注解 @Configuration,然后在类中实现 pac4j Config 类的 Bean。
代码如下:
package tech.bookhub.config;
import org.pac4j.core.config.Config;
import org.pac4j.oauth.client.GitHubClient;
import org.springframework.context.annotation.Bean;
import org.springframework.context.annotation.Configuration;
@Configuration
public class Pac4jConfig {
    @Bean
    public Config config() {
        GitHubClient gitHubClient = new GitHubClient("a85f19ea0f51face127a", "84bf0695ea2a62674b8d5961a02a4c793bf23e2a");
        Clients clients = new Clients("http://localhost:8888/callback",gitHubClient);
        Config config = new Config(clients);
        return config;
    }
}
代码中可以看到,在服务端配置中获得的 Client ID 和 Client secret 作为认证配置项,都传入了 GitHubClient 的构造函数。然后将生成的客户端对象传递给 Config 的构造函数。
# 配置 Security
指南未用 Spring Security 实现复杂的用户认证配置,仅用于 pac4j 的对接,所以我们先只关注认证的配置部分。
我们新建一个 SecurityConfig 类,用于存放相应的 SecurityFilterChain 的 Bean 定义,代码如下:
package tech.bookhub.config;
import org.pac4j.core.config.Config;
import org.pac4j.jee.filter.CallbackFilter;
import org.pac4j.jee.filter.LogoutFilter;
import org.pac4j.jee.filter.SecurityFilter;
import org.pac4j.springframework.security.web.Pac4jEntryPoint;
import org.springframework.beans.factory.annotation.Autowired;
import org.springframework.context.annotation.Configuration;
import org.springframework.core.annotation.Order;
import org.springframework.security.config.annotation.web.builders.HttpSecurity;
import org.springframework.security.config.annotation.web.configuration.EnableWebSecurity;
import org.springframework.security.config.annotation.web.configuration.WebSecurityConfigurerAdapter;
import org.springframework.security.config.http.SessionCreationPolicy;
import org.springframework.security.web.authentication.www.BasicAuthenticationFilter;
@EnableWebSecurity
public class SecurityConfig {
    @Configuration
    @Order(1)
    public static class CallbackWebSecurityConfigurationAdapter extends WebSecurityConfigurerAdapter {
        @Autowired
        private Config config;
        @Autowired
        private Pac4jEntryPoint pac4jEntryPoint;
        protected void configure(final HttpSecurity http) throws Exception {
            http.antMatcher("/callback")
                    .addFilterBefore(new CallbackFilter(config), BasicAuthenticationFilter.class)
                    .csrf().disable();
        }
    }
    @Configuration
    @Order(2)
    public static class LogoutWebSecurityConfigurationAdapter extends WebSecurityConfigurerAdapter {
        @Autowired
        private Config config;
        protected void configure(final HttpSecurity http) throws Exception {
            final LogoutFilter logoutFilter = new LogoutFilter(config, "/?defaulturlafterlogout");
            logoutFilter.setDestroySession(true);
            http.antMatcher("/pac4jLogout")
                    .addFilterBefore(logoutFilter, BasicAuthenticationFilter.class)
                    .csrf().disable();
        }
    }
    @Configuration
    @Order(3)
    public static class GitHubAuthAdapter extends WebSecurityConfigurerAdapter {
        @Autowired
        private Config config;
        protected void configure(HttpSecurity http) throws Exception {
            final SecurityFilter filter = new SecurityFilter(config,"GitHubClient");
            http.antMatcher("/login/github")
                    .addFilterBefore(filter, BasicAuthenticationFilter.class)
                    .sessionManagement().sessionCreationPolicy(SessionCreationPolicy.ALWAYS);
        }
    }
    @Configuration
    @Order(4)
    public static class CommonAuthAdapter extends WebSecurityConfigurerAdapter {
        @Autowired
        private Config config;
        protected void configure(HttpSecurity http) throws Exception {
            http
                    .csrf().disable()
                    .authorizeRequests()
                    .antMatchers("/login/**").authenticated()
                    .anyRequest().permitAll();
        }
    }
}
以上代码中,我们通过使用 JEE 相应的 SecurityFilter 用于认证判定,跳转相应的认证服务端,使用 CallbackFilter 接受服务端的回调请求,使用 LogoutFilter 实现退出登录的请求。
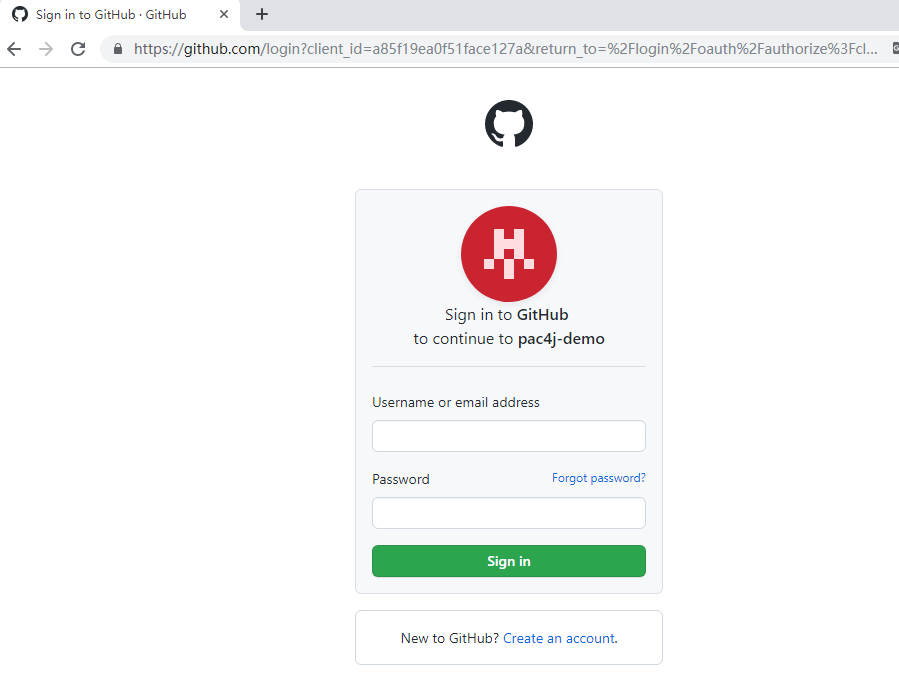
我们运行项目,在浏览器输入 http://localhost:8888/login/github (opens new window),浏览器将跳转到 GitHub OAuth 认证界面,如下图:
我们输入自己的 GitHub 账号和密码,点击登录后,认证成功后,将会获得 /login/github 对应的响应数据,如下图:

如果我们在 GitHubClient 配置的 Client ID、Client secret 不匹配,在认证成功后将会进入报错页面,如下图:

本篇 demo 内容见 GitHub,Demo 1 (opens new window)。